
abeMeda
The File Is Out There


abeMeda Frequently Asked Questions (FAQ)
- Can abeMeda read catalog files from CDWinder, neoFinder or CDFinder?
- or: How do I share catalog files between abeMeda and neoFinder ? How do I import my neoFinder catalog files from the Mac into abeMeda ?
- How many catalog files can abeMeda manage?
- What types of media can abeMeda catalog ? I read that abeMeda was once called CDWinder. Does that mean it can only catalog CDs?
- How do I move my abeMeda database to a new PC / new location / new version ?
- How can I backup my abeMeda database ?
- How do I export/move my abeMeda settings to a new PC / new location ?
- When cataloging a large drive with many photos, abeMeda sometimes takes a very long time and uses lots of resources. What about that ?
- How do I rename a catalog? Or add a comment to it ?
- How do I set up abeMeda for a multi-user network environment?
- While I can see and browse NeoFinder
catalogs, abeMeda can not find the files on my discs, to open or
show them. How do I fix that?
or: abeMeda asks for “Removable Media required” although the file I need is on a connected network share.Why ?
or: I moved the folder for this catalog I created. Can I still use and update the catalog, without re-creating it from scratch ? - Can abeMeda catalog photo previews?
- The thumbnail previews for all the PSD (MP4, MKV, TS, RAW, ...) files are missing! Can you fix this ?
- How to enable and configure the cataloging of PDF metadata (thumbnails and/or content) ?
- How to enable and configure the cataloging of video metadata with ffmpeg ?
- How to enable and configure the cataloging of more archive file content with 7-Zip ?
- My Google Earth™ interaction does not work. How do I fix that ?
Can abeMeda read catalog files from CDWinder, neoFinder or CDFinder?
or: How do I share catalog files between abeMeda and neoFinder ? How do I import my neoFinder catalog files from the Mac into abeMeda ?The answer is quite easy, really: abeMeda and CDFinder share the same catalog file format. And this catalog file format works across plattforms as well. It's like JPEG files - you don't import them, they just work, wherever you are.
With abeMeda and CDFinder, this was a design goal from the start - it's the very basis of the cross platform cataloging system. Both programs can read, write and manipulate the catalog files, regardless of who created them or saved them last. So there's no need of importing or conversion - you just tell abeMeda where the catalog files are (e.g. choose your database folder) and work with them. (sharing catalog files over the network and/or across platforms is also described here)
How many catalog files can abeMeda manage?
Technically, the limit is near 4,000,000,000 catalogs. Every catalog file created of a volume or folder can itself contain up to 4,000,000,000 files and folders. Typical larger users have around 5000 catalog files and abeMeda deals with that easily...What types of media can abeMeda catalog ? I read that abeMeda was once called CDWinder. Does that mean it can only catalog CDs?
abeMeda is being developed since 1998, when people were still using little square plastic boxes named "Floppy Disks" to store their data, and started out in life called CDWinder. But even the use of "CD" in its name never meant it was or is limited to just cataloging CDs.In fact, CDWinder back then and abeMeda today can catalog anything that Windows recognizes as a disk or storage medium, be it an iPod (in that case, abeMeda will even read your hidden music library on that iPod, too!), USB stick, hard disc, server volume, FTP server, Audio-CDs, anything! Of course, any CD, DVD-ROM, HD-DVD, BlueRay - you name it, abeMeda can catalog it.
Which is the main reason why we thought of a better name - and while CDWinder could also have been renamed to DVDWinder, MusicWinder, AudioWinder, iPodWinder, USBStickWinder, or BlueRayWinder - we decided to name it abeMeda ;-)
How do I move my abeMeda database to a new PC / new location / new version ?
If you wish to move your catalog database from your existing PC to a new one, follow these instructions:1. Install the current version of abeMeda on your new PC, and type in your license key.
2. Copy the abeMeda Database Folder from the old to the new PC. If you don't know where your Database Folder is located on your old PC, please open the abeMeda Preferences window on your old PC, and look at the "Database Folder" value in the “General” tab. That is where abeMeda stores the catalog files, and that folder must be copied to the new PC.
3. On the new PC, once you have copied the full Database Folder to a proper location, maybe your Documents folder, simply show abeMeda where that folder is located. Again, you do that using the abeMeda Preferences.
That was all.
Please do NOT try to "Import" the catalogs, as the Import feature in abeMeda is only used for catalog files of other applications.
Also, do NOT drag the database folder into the main window of abeMeda, as that will create a catalog of that folder, and that is not what you want.
How can I backup my abeMeda database ?
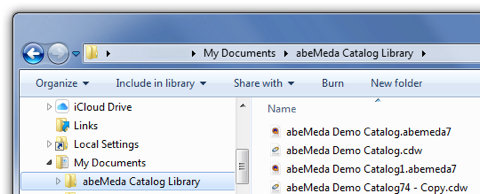
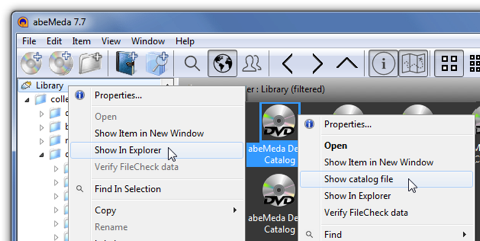
If you wish to backup your catalog database, follow these instructions. Basically, you copy the catalog files themselves :1. As before, locate your database folder. Check what you selected in the Preferences, or select “Show in Explorer” on your Library. Or select “Show catalog file” on one of your catalogs. That will open an Explorer window with your catalog files in your database folder.
2. Now copy the whole folder (or only the files you wish) from the database folder to a different, safe location, for backup.
3. Whenever you need, you can restore the database by simply copying the files back from your backup location to your actual database folder. Or, you can even switch your database folder in the Preferences to your chosen backup location, and work from there (if that is an option for you).
How do I export/move my abeMeda settings to a new PC / new location ?
When you move your abemeda installation to a new computer, and want to preserve your settings, there are a couple of things to consider. Although there is no explicit “export” of settings, you can easily find and transfer most of what you need keep working.First, transfer your database. We covered that right above.
In abeMeda7, that also contains a number of your settings, namely your databaseSettings, your albums and smartFolders, your keywords, people, annotations and XMP metadata presets - as they are shared for all users of the database anyway. Also, the catalogs contain their latest cataloging settings - so by opening the settings of one of your catalogs, and using its settings as your new default on the new machine, you have transferred your cataloging settings as well.
You will need to reconfigure your Helpers, but they probably reside somewhere else on your new machine anyway. Also, your window dimensions and positions - again something that would want to adapt to a new setup anyway.
Second, you can also transfer your appData support folder - this would cover backups for the lists mentioned above, log files, and things like the labels or the last used query.
You can find that folder easiest via the Logging tab in the Options - use the “Show logfile” button to open the folder where this data is kept. Do the same on the new machine.
And then copy/move the data from one folder to the other.
Third, remove your license from the old machine, and re-apply your license file on the new machine.
Then check and adapt the few options not covered here, and you’re done.
When cataloging a large drive with many photos, abeMeda sometimes takes a very long time and uses lots of resources. What about that ?
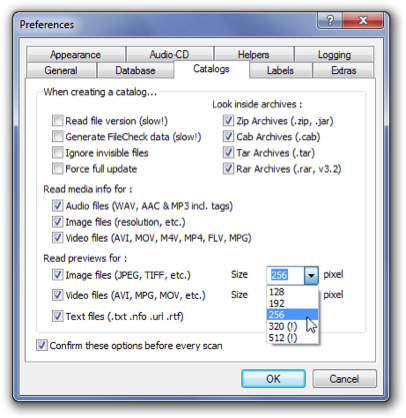
But there are a few things to consider: If you chose to get big thumbnails, you put additional stress on your system. The larger the thumbnails, the more space they need, and that may cause problems with huge drives and eg hundreds of thousands of files on them.
Also, abeMeda uses a more elaborate method of generating thumbnails this big, because they need to look better. There's an internal threshold for this, which decides when we switch to the more costly method - per default it is at 300 px. So, a catalog with 256px thumbnails will be a lot faster than one with 320 px. If you have different needs, that threshold can also be altered, you can find how to do that in the users guide. In our latest version (6.2.1) the threshold is also visualized in the catalog settings - thumbnail sizes above the threshold are shown with a "(!)", to indicate that they will take longer.
So, keep in mind:
- Be prepared to wait longer for higher resolution thumbnails.
- Know about your thresholds and sizes and set them accordingly.
- If necessary, split up huge drives in several catalogs, to make updating and maintaining them easier and faster. You can catalog folders separately, and group folders of the same drive in a catalog folder with the drives name.
How do I rename a catalog? Or add a comment to it ?
The Inspector not only displays all information abeMeda knows about a catalog (or any other item), but only allows you to change or add additional information. You can rename an item, add a label or comment to it, or make specific adjustments. Your changes are confirmed once you leave that item and choose another one.But you can also use the Properties dialog to make changes. Just select the catalog file or folder in the main window and chose Properties from the File menu. A window will appear that not only allows you to rename the catalog or folder, but also to enter the comment.
Also, you can just select the item you wish to rename, and click with the mouse over the name field area. Then wait a moment, and an edit area will appear, allowing you to change the name.
How do I set up abeMeda for a multi-user network environment?
That is actually quite easy, please see here for a detailed description.
While I can see and browse NeoFinder catalogs, abeMeda can not find the files on my discs, to open or show them. How do I fix that?
or: abeMeda asks for “Removable Media required” although the file I need is on a connected network share.Why ?or: I moved the folder for this catalog I created. Can I still use and update the catalog, without re-creating it from scratch ?
while abeMeda and NeoFinder take great care to uniquely identify every volume (or network share) they encounter and catalog, both are unfortunately inherently limited when it comes to anticipating where and how to find network volumes automatically on the other platform.
Of course, neither abeMeda nor NeoFinder have any idea of how you organise your network shares. Nor can we assume that you use the same mount points, or even the same names on both platforms - or dare to insist that you do so in a special way. But that naturally limits our media recognition for catalogs that were created on the other platform.
So, that is why abeMeda needs your help to point the NeoFinder catalog to the correct network location or folder on your Windows PC. What you can use for that is called “Reconnect” for catalogs, and you can find it in the Edit menu. It allows you to (re)connect an existing catalog to any folder or network location you want. “Reconnect” will ask you for the location of the cataloged data on your PC. Once you select that, and abeMeda finds the data it is looking for, you can use that catalog just as any locally created one.
Another option is to use the volume/path selection in the lower part of the “ask for media” dialog - select the correct path for the catalogs’ data from the windows side there, and click the “Remember this selection” option, to have the catalog retain that selection. Also: make sure that this is in turn a path that all the participating abeMeda users/installation can reach, or this will also only work for a part of them.
Can abeMeda catalog photo previews?
Yes, abeMeda can read a number of image formats and generate thumbnails from them when cataloging: JPEG, TIFF, BMP, GIF, PNG, PSD, plus a whole range of RAW image formats (via libraw) and PDF documents (and the list is constantly expanding).In addition, abeMeda generates previews of many video files, reads embedded cover art or creates contact sheets on demand.
Even from audio files or audio CDs, abeMeda reads and stores the available cover art in its catalogs.
In addition, abeMeda can also read a lot of meta data from these files, such as the size and color depth of the images, and also the EXIF and XMP/IPTC data, which are very helpful in any search.
The thumbnail previews for all the PSD (MP4, MKV, TS, RAW, ...) files are missing! Can you fix this ?
abeMeda needs certain helpers for specific media file types, since it can not read all of them by itself. If these helpers are missing, you might not see the thumbnails or metadata for the respective filetypes as expected. The following file types will benefit from external help:PSD - PSD can only be read if a recent version of QuickTime for Windows is installed.
MP4, MOV - video thumbnails and metadata for these can be read via ffmpeg, QuickTime or by installing a DirectShow video codec pack
MKV, TS, VOB - video thumbnails and metadata for these can be read by installing ffmpeg, or a DirectShow video codec pack
RAW - all RAW photos are being read with the help of libRAW: Make sure abeMeda is correctly and completely installed, and libraw.dll is available in the program directory.
PDF - thumbnails and content for PDF files are provided by Xpdf, which needs to be installed and configured in the Helpers section of abeMeda’s Preferences. see below.
You can find links to ffmpeg, QuickTime and our preferred video codec pack on our links page.
How to enable and configure the cataloging of PDF metadata (thumbnails and/or content) ?
1.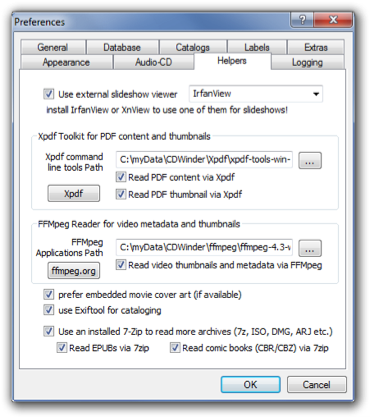
2. Open abeMeda, go to Preferences->Helpers. In the section “Xpdf Toolkit”, point abeMeda to the folder where the Xpdf binaries are installed (bin32 or bin64 inside that unpacked Xpdf folder). Enter the folder path manually, or use the browse button to help.
3. If abeMeda finds the needed tools in the provided folder, it will enable the options for PDF thumbnails and content.
4. Choose whatever combination of thumbnails and/or content you need for your catalogs, and close the Preferences dialog.
Any catalog created with these settings will now feature PDF thumbnails and/or content according to your choice.
How to enable and configure the cataloging of video metadata with ffmpeg ?
1. Obtain and install ffmpeg, an open source video toolkit. You can find a link to ffmpeg on our links page or in the Helpers dialog. Download a Windows build of the latest version, follow its instructions and install rsp. unpack ffmpeg to a folder of your choice.2. Open abeMeda, go to Preferences->Helpers. In the section “FFMpeg Reader”, point abeMeda to the folder where you placed the ffmpeg binaries (ffmpeg.exe and ffprobe.exe are required; found usually in folder “bin” inside that unpacked ffmpeg folder). Enter the folder path manually, or use the browse button to help.
3. If abeMeda finds the needed tools in the provided folder, it will enable the options for reading videos via ffmpeg.
4. Activate the checkbox to read via ffmpeg, and close the Preferences dialog.
Any catalog created with these settings will now ask ffmpeg for video thumbnails and metadata as needed. And it will also be used and thus enhances movie contact sheet generation, and/or can help with problems you may experience when generating them.
How to enable and configure the cataloging of more archive file content with 7-Zip ?
1. Obtain and install 7-Zip, an open source archive file tool. You can find a link to 7-Zip on our links page. Download the latest version, doubleclick the installer, follow its instructions and install 7-Zip to a folder of your choice.2. Open abeMeda, go to Preferences->Helpers. If abeMeda finds an installed 7-Zip, it will enable the option for using it to read more archive file formats (ISO, DMG, ARJ, LHA, 7z and RAR v5+, books and comics).
3. Activate the checkbox to read archives via 7-Zip, and/or also the options for EPUBs or comic books if you so desire, and close the Preferences dialog.
Any catalog created with these settings will now ask 7-Zip for archive, books and disc-image files content as needed.
My Google Earth™ interaction does not work. How do I fix that ?
Over the years, Google has released a number of desktop versions of Earth™ that would not correctly react to the API and the commands that Google itself recommends for interaction with it. abeMeda uses this API too, to show GPS coordinates and places in Google Earth™, or get coordinates from it for geotagging. And if the version you have installed does not react to these API calls, then abeMeda will not be able to perform these functions.As Google has phased out a number of versions in these past months, the version that currently (March 2021) works is Google Earth™ Pro v7.3.2. For now, the more current (latest) version 7.3.3 does NOT work.
You can obtain previous versions, specifically the v7.3.2, from Google at https://support.google.com/earth/answer/168344?hl=en&ref_topic=4363014
Now, the complicating factor is that Google Earth™ comes with automatic updating, that is pretty intrusive, and will sometimes update your freshly installed version within minutes - often to their latest version which is NOT capable of what we need (currently 7.3.3). After long fights with this, we have dug up several tips to disable this autoupdate that worked for us - and can share them here, so you can continue to use Google Earth™ version of your choice (v7.3.2).
1. Open the Task Scheduler in the Control Panel, and Disable all Google Update tasks. We also removed any additional triggers on them, to ensure they stay off.
2. delete the folder C:\Users\Admin\AppData\Local\Google\Update
3. delete the folder C:\Program Files (x86)\Google\Update
Now, if you use Google Chrome, this will disable automatic Chrome updating too, but having a working Google Earth™ setup was more important for us.
Your mileage may wary, and an enterprise level install may pose different requisites altogether.
Also, you may need to repeat or at least check these whenever you do decide to re-install Google Earth™.
In the end, these steps worked for us and a number of inquiring customers, for the time being.